Python Wikipedia Article
In this tutorial, we will walk through how to reproduce the Wikipedia article
about Python. You will find the online reference
here. This
article has a good balance of simple elements like
Paragraph, Header while
also housing slightly complex 2 column layouts. This should serve as a good
introduction to the PdfPug layout system.
Note
This tutorial focuses on introducing the various PdfPug modules and layouts. As such, the content of the wikipedia article being showcased will be truncated and be a smaller subset of the actual content in the wikipedia article.
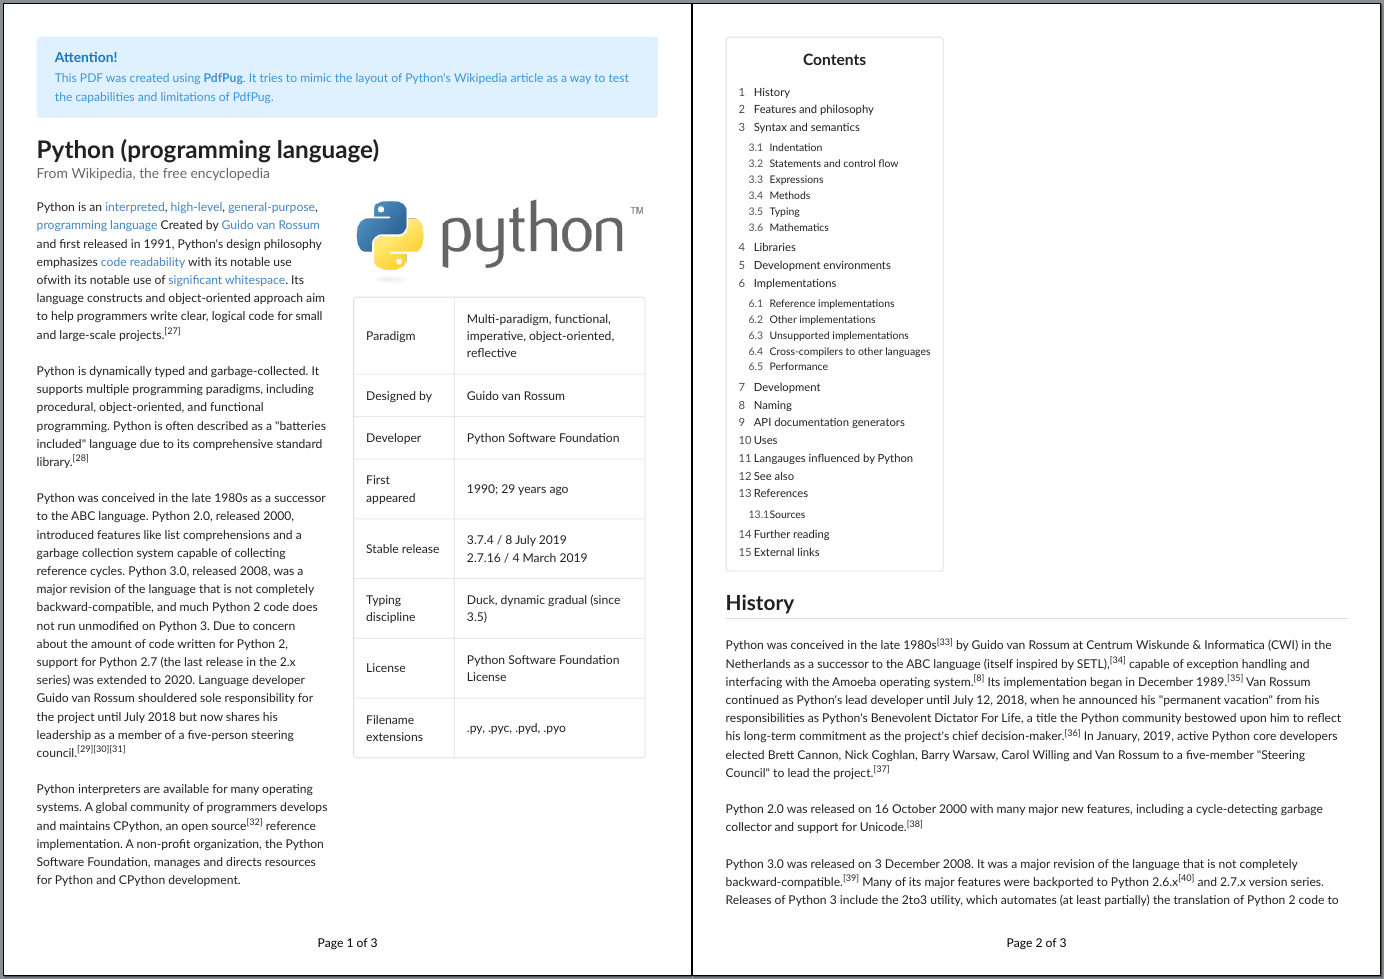
The final output would look something like,
The source code and the output PDF file can be downloaded here. If you notice
any discrepancies, do report a bug.
Source Code,
Output PDF,
Python Logo Image
Article Title
The first element to be defined is the article header “Python (programming
language)”. We can define headers using Header
class. PdfPug header also supports adding a caption (or sub-header) which
can be used to add the supporting text “From Wikipedia, the …”.
from pdfpug.modules import Header
from pdfpug.common import Alignment

main_title = Header(
    "Python (programming language)",
    sub_header="From Wikipedia, the free encyclopedia",
    alignment=Alignment.left,
)
Introduction Section
The introduction section is a 2 column layout with an introduction paragraph on the left and a table on the right. There are multiple ways of implementing this layout. We will take the approach of creating the left column first followed by the right column and then add them both to a grid.
Let us start with creating the left column contents which is a
Paragraph containing URL links and
line breaks.
Note
The Paragraph class supports formatting text
(bold, italics, underline, superscript etc.), adding URL and line breaks.
from pdfpug.modules import Paragraph
from pdfpug.common import superscript, url

# Define URLs before to maintain code sanity
interpreted = url("https://en.wikipedia.org/wiki/Interpreted_language", "interpreted")
guido = url("https://en.wikipedia.org/wiki/Guido_van_Rossum", "Guido van Rossum")
readability = url("https://en.wikipedia.org/wiki/Code_readability", "code readability")
high_level = url(
    "https://en.wikipedia.org/wiki/High-level_programming_language", "high-level"
)
general_purpose = url(
    "https://en.wikipedia.org/wiki/General-purpose_programming_language",
    "general-purpose",
)
programming_language = url(
    "https://en.wikipedia.org/wiki/Programming_language", "programming language"
)
whitespace = url(
    "https://en.wikipedia.org/wiki/Off-side_rule", "significant whitespace"
)

intro_para = Paragraph(
    f"Python is an {interpreted}, {high_level}, {general_purpose}, "
    f"{programming_language} Created by {guido} and first released in 1991, "
    f"Python's design philosophy emphasizes {readability} with its notable use of"
    f"with its notable use of {whitespace}. Its language constructs and "
    f"object-oriented approach aim to help programmers write clear, logical code "
    f"for small and large-scale projects.{superscript('[27]')}"
    f"<br><br>Python is dynamically typed and garbage-collected. It supports multiple "
    f"programming paradigms, including procedural, object-oriented, and functional "
    f'programming. Python is often described as a "batteries included" language '
    f"due to its comprehensive standard library.{superscript('[28]')}<br><br>"
)
With the content ready, let’s add it to a Column.
Since we need a 2 column layout, the width of both the left and right column
need to be specified.
from pdfpug.layouts import Column

intro_para_column = Column(width=7)
intro_para_column.add_element(intro_para)
Let’s now proceed to build the right column and its contents. As can be seen,
the right column consists of an image and a table. PdfPug allows us to add
these content types via the Image and
Table class.
from pdfpug.modules import Image, Table

# The Image class expects the absolute file path of the image!
python_logo = Image(
    os.path.join(os.path.dirname(os.path.realpath(__file__)), "python-logo.png")
)

intro_table = Table(
    data=[
        [
            "Paradigm",
            "Multi-paradigm, functional, imperative, object-oriented, reflective",
        ],
        ["Designed by", "Guido van Rossum"],
        ["Developer", "Python Software Foundation"],
        ["First appeared", "1990; 29 years ago"],
        ["Stable release", "3.7.4 / 8 July 2019<br>2.7.16 / 4 March 2019"],
        ["Typing discipline", "Duck, dynamic gradual (since 3.5)"],
        ["License", "Python Software Foundation License"],
        ["Filename extensions", ".py, .pyc, .pyd, .pyo"],
    ]
)
Let’s again build a new column with its contents,
intro_table_column = Column(width=7)
intro_table_column.add_element(python_logo)
intro_table_column.add_element(intro_table)
With the left and right column created, the final step to creating the 2 column
grid is to create a Grid and add these columns to it.
from pdfpug.layouts import Grid

intro_grid = Grid()
intro_grid.add_layout(intro_para_column)
intro_grid.add_layout(intro_table_column)
Table of Contents
One can observe that the table of contents is actually an ordered list. The list is encapsulated within a segment container. Creating this should be fairly simple.
from pdfpug.modules import OrderedList, Segment

contents_list = OrderedList(
    [
        "History",
        "Features and philosophy",
        {
            "Syntax and semantics": [
                "Indentation",
                "Statements and control flow",
                "Expressions",
                "Methods",
                "Typing",
                "Mathematics",
            ]
        },
        "Libraries",
        "Development environments",
        {
            "Implementations": [
                "Reference implementations",
                "Other implementations",
                "Unsupported implementations",
                "Cross-compilers to other languages",
                "Performance",
            ]
        },
        "Development",
        "Naming",
        "API documentation generators",
        "Uses",
        "Langauges influenced by Python",
        "See also",
        {"References": ["Sources"]},
        "Further reading",
        "External links",
    ]
)

contents_segment = Segment(
    [Header("Contents", tier=HeaderTier.h3), contents_list],
    spacing=SegmentSpacing.compact,
)
Notice that we are setting SegmentSpacing.compact as the segment spacing. This ensures that the segment container takes only the required amount of width. Otherwise, it would span the entire page width.
History & Other Sections
history_header = Header(
    "History", tier=HeaderTier.h2, style=HeaderStyle.dividing, alignment=Alignment.left
)

history_para = Paragraph(
    f"Python was conceived in the late 1980s{superscript('[33]')} by Guido van Rossum "
    f"at Centrum Wiskunde & Informatica (CWI) in the Netherlands as a successor to the "
    f"ABC language (itself inspired by SETL),{superscript('[34]')} capable of "
    f"exception handling and interfacing with the Amoeba operating system."
    f"{superscript('[8]')} Its implementation began in December 1989."
    f"{superscript('[35]')} Van Rossum continued as Python's lead developer until "
    f'July 12, 2018, when he announced his "permanent vacation" from his '
    f"responsibilities as Python's Benevolent Dictator For Life, a title the "
    f"Python community bestowed upon him to reflect his long-term commitment as "
    f"the project's chief decision-maker.{superscript('[36]')} In January, 2019, "
    f"active Python core developers elected Brett Cannon, Nick Coghlan, Barry Warsaw, "
    f'Carol Willing and Van Rossum to a five-member "Steering Council" to lead the '
    f'project.{superscript("[37]")}'
)

library_header = Header(
    "Libraries",
    tier=HeaderTier.h2,
    style=HeaderStyle.dividing,
    alignment=Alignment.left,
)

library_para = Paragraph(
    "Python's large standard library, commonly cited as one of its greatest strengths,"
    "[97] provides tools suited to many tasks. For Internet-facing applications, "
    "many standard formats and protocols such as MIME and HTTP are supported. It "
    "includes modules for creating graphical user interfaces, connecting to relational "
    "databases, generating pseudorandom numbers, arithmetic with arbitrary precision "
    "decimals,[98] manipulating regular expressions, and unit testing."
    "<br><br>Some parts of the standard library are covered by specifications "
    "(for example, the Web Server Gateway Interface (WSGI) implementation wsgiref "
    "follows PEP 333[99]), but most modules are not. They are specified by their "
    "code, internal documentation, and test suites (if supplied). However, because "
    "most of the standard library is cross-platform Python code, only a few modules "
    "need altering or rewriting for variant implementations."
    "<br><br>As of March 2018, the Python Package Index (PyPI), the official "
    "repository for third-party Python software, contains over 130,000[100] "
    "packages with a wide range of functionality, including: "
)

library_list = UnorderedList(
    [
        "Graphical user interfaces",
        "Web frameworks",
        "Multimedia",
        "Databases",
        "Networking",
        "Test frameworks",
        "Automation",
        "Web scraping[101]",
        "Documentation",
        "System administration",
        "Scientific computing",
        "Text processing",
        "Image processing",
    ]
)
Building the PDF
The final thing involves importing the PdfReport class from
the PdfPug library and creating an object. This is the main class that will
house all the elements we want to add to our PDF file.
from pdfpug import PdfReport

report = PdfReport("PythonWiki.pdf")
report.add_elements(
    [
        main_title,
        intro_grid,
        contents_segments,
        history_header,
        history_para,
        library_header,
        library_para,
        library_list,
    ]
)

report.generate_pdf("python.pdf")
Voila! This should generate a PDF file similar to the output shown at the start of this tutorial.