Modern Resume
In this tutorial, we will walk through creating a modern resume. This tutorial is fairly extensive and uses a majority of the PdfPug modules and their properties to achieve the desired look and feel. If you are unfamiliar with some of the basic elements of PdfPug, it is recommended to first go through the Python Wikipedia Article tutorial that is easier than and smaller.
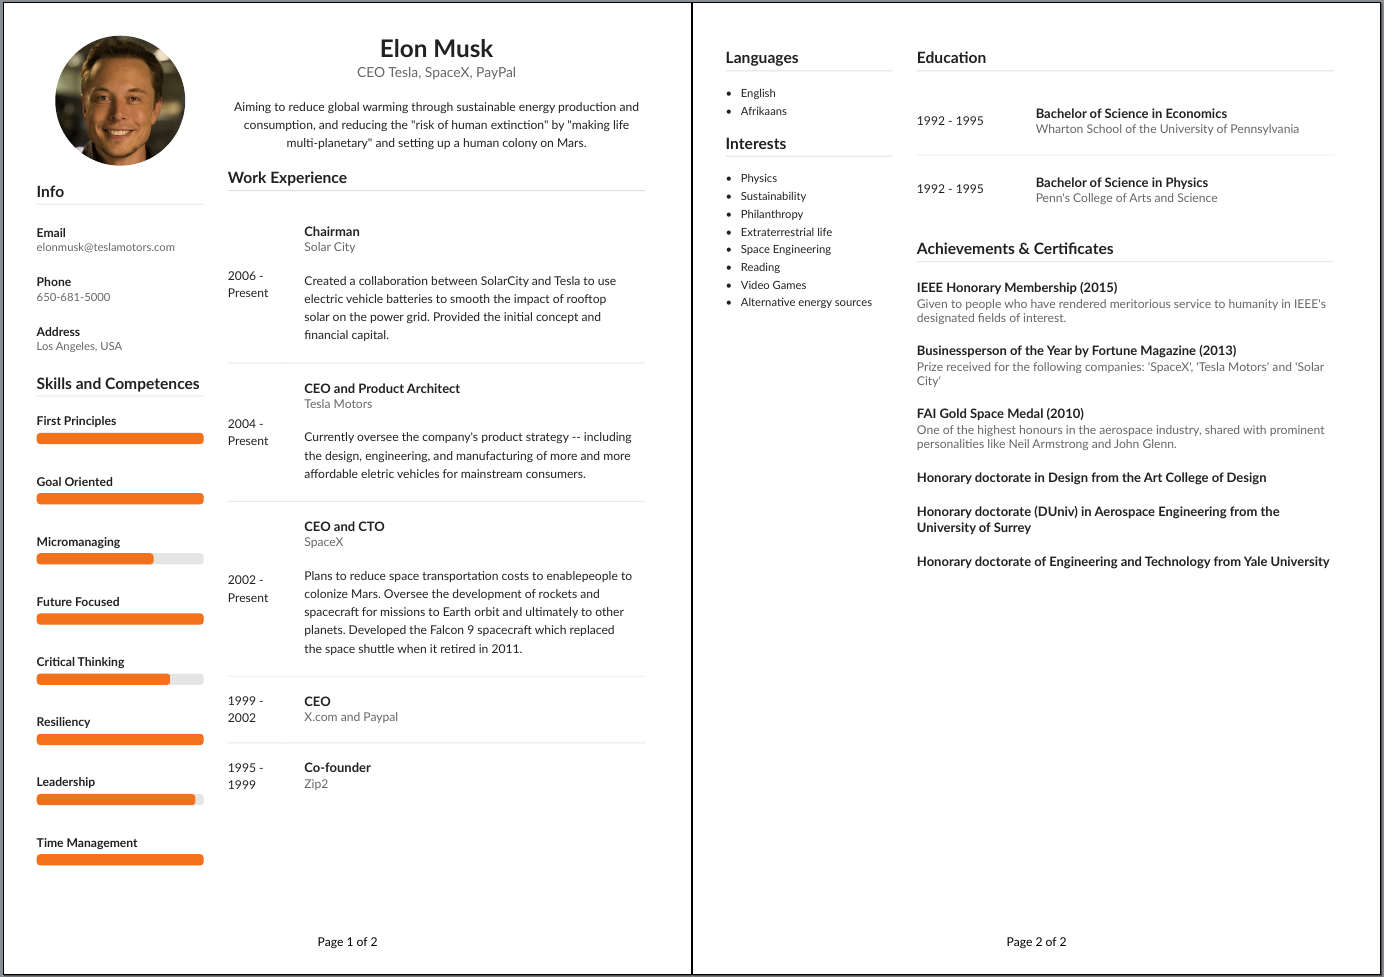
The final output would look something like the screenshot below. Doesn’t it look great? Let’s build that!
Note
The information displayed in the resume may contain factual errors. The point of this tutorial is to explore PdfPug’s elements and layouts and showcase its capabilities.
The source code and the output PDF file can be downloaded here. If you notice
any discrepancies, do report a bug.
Source Code,
Output PDF,
Elon Musk Profile Picture
Approach
Looking at the output, at a high level, this is a 2 column grid that contains a mixture of elements like headers, list, paragraphs, tables and even progress bars to indicate skill level. A layout like this should be implemented one at a time to take an organised approach.
A possible starting point could be the left column that is fairly simple and then moving on to the right column that is slightly more complex due to the table that contains other elements i.e header inside a cell inside a table. Inception!
Warning
There is a known bug where a Grid that
bleeds to the next page causes the layout to go haywire. Due to this
limitation, in this tutorial 2 grid were used. One for the first page
and the other for the second page.
First Page - Left Column
The first element we need to build is an image that should be circular and centered to the left column layout.
from pdfpug.modules import Image
from pdfpug.common import ImageLayout, ImageStyle, Size

profile_pic = Image(
    os.path.join(os.path.dirname(os.path.realpath(__file__)), "musk.jpeg"),
    style=ImageStyle.circular,
    size=Size.small,
    layout=ImageLayout.centered,
)
This is followed by the the info section which comprises of just headers.
In the code block below, playing with the HeaderTier,
Alignment and adding a sub-header helped achieved
the style. In order to have a dividing horizontal line be drawn after the info
header, a dividing HeaderStyle is used.
from pdfpug.modules import Header
from pdfpug.common import HeaderTier, HeaderStyle, Alignment

info_header = Header(
    "Info", tier=HeaderTier.h3, style=HeaderStyle.dividing, alignment=Alignment.left
)

email = Header(
    "Email",
    sub_header="elonmusk@teslamotors.com",
    alignment=Alignment.left,
    tier=HeaderTier.h5,
)
Next up is the skills and competences section. Although this requires an
unconventional element, it appears to be the best fit for the use case.
The ProgressBar element supports various
modifications to its default style like Size,
Color, title etc.
from pdfpug.modules import ProgressBar
from pdfpug.common import Color

skills_header = Header(
    "Skills and Competences",
    tier=HeaderTier.h3,
    style=HeaderStyle.dividing,
    alignment=Alignment.left,
)

resiliency = ProgressBar(100, title="Resiliency", size=Size.small, color=Color.orange)
With the content created, we can add them all to a column.
from pdfpug.layouts import Column

first_page_left_column = Column(width=4)
first_page_left_column.add_element(profile_pic)
first_page_left_column.add_element(info_header)
first_page_left_column.add_element(email)
first_page_left_column.add_element(skills_header)
first_page_left_column.add_element(resiliency)
First Page - Right Column
In the right column, there is the resume title that displays the name and the
current designation. There is a subtle difference in this header size. It is
bigger than a h1 tier header. How do one achieve that? Using the size
attribute that takes in Size enum.
Warning
It is important to note that the header size can be defined either using the tier or size attribute but not both!
name_header = Header(
    "Elon Musk", sub_header="CEO Tesla, SpaceX, PayPal", size=Size.huge, tier=None
)
This is followed by a brief abstract that can be easily implemented using the
Paragraph element with one minor adjustment to the
alignment attribute to ensure that the content is centered.
summary = Paragraph(
    "Aiming to reduce global warming through sustainable energy production and "
    'consumption, and reducing the "risk of human extinction" by '
    '"making life multi-planetary" and setting up a human colony on Mars.',
    alignment=ParagraphAlignment.center,
)
Now comes the tricky work experience section. At a quick glance, it is fairly
obvious that this is a Table. However, looking
closer, there are cells that would need to house other PdfPug elements like
header, paragraph to achieve the desired appearance. This requires us to use
the Cell element to implement that inception of
elements.
Going by the bottom top approach, the contents can be created using a header
and a paragraph. This hybrid content need to displayed in a vertical layout
which can be achieved using a Segment element
designed to group content together. However, the style should be set to
SegmentType.basic to ensure that it does not draw any borders. Finally,
this element should added to a Cell which in
turn is the basic building block of a Table.
work_header = Header(
    "Work Experience",
    tier=HeaderTier.h3,
    style=HeaderStyle.dividing,
    alignment=Alignment.left,
)

work_exp = Table(
    data=[
        [
            "2006 - Present",
            Cell(
                Segment(
                    [
                        Header(
                            "Chairman",
                            sub_header="Solar City",
                            alignment=Alignment.left,
                            tier=HeaderTier.h4,
                        ),
                        Paragraph(
                            "Created a collaboration between SolarCity and Tesla "
                            "to use electric vehicle batteries to smooth the "
                            "impact of rooftop solar on the power grid. Provided "
                            "the initial concept and financial capital."
                        ),
                    ],
                    segment_type=SegmentType.basic,
                    spacing=SegmentSpacing.compact,
                )
            ),
        ]
    ],
    spacing=TableSpacing.compact,
    table_type=TableType.bare,
)
Oh, another minor detail to notice is that the table style is set to
TableType.bare to ensure no boundaries are drawn. Take a look at
TableType for other table styles.
Finally,
report = PdfReport()
report.add_element(first_page_grid)
report.generate_pdf("modern_resume_tutorial.pdf")
This is where the tutorial can be wrapped up. The contents and layout of page 2 are fairly simple to implement yourself. Give it a try. If you are stuck, you can always refer to the source code linked at the start of this tutorial.